


Embracing the chaos might be the journey we take to finding peace. ~ Rachel Hollis
Creative types gotta create. It’s not just a slogan, it’s a credo for most of you reading today’s Halloween Haunt. We all find different ways to release the pressure and drive to create; one of the ways that I find satisfaction and pure enjoyment is through papercrafting. I don’t usually much free time to engage in crafting as I would like, so I appreciate when I find a project that is cute, quick to make, and I can use my stash of supplies — or use it as an excuse to buy new paper and ephemera ;o) Hence, this zig zag mini journal is so fun!
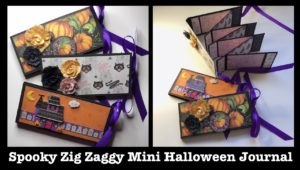
I know most of the eyes reading this Halloween Haunt entry are writers, so paper crafting may not be in your comfort zone. My ask: follow the step-by-step instructions for creating your own journal and then let loose. Embrace some chaos, some glue, and decorate your journal with whatever you have around your workspace (not your familiar though!). This journal can be used to capture your favorite Halloween photos (2” x 3” wallet sized) and journaling (there’s your writing!)! I have made three themed journals, and I would love to see what you create! Enjoy!
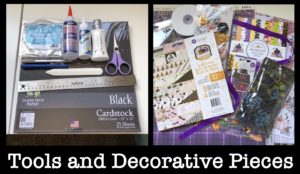
Tools
- Scissors
- Ruler
- Liquid glue (I used double-sided crafting tape for the spine)
- Black card stock available on Amazon (I’m using 100 lb. 12” x 12”)
- Bone tool or the back of your trusty dagger (a butter knife works too)
- Decorative paper and ephemera pieces that you have collected from your adventuring
- Coordinating ribbon, about 24” cut in half
Note: For advanced crafters, I used a Fiskars cutting board, Scor-Pal, and decorative paper/ephemera from Graphic 45, Prima, and Echo Park (all can be ordered through Scrapbook.com).
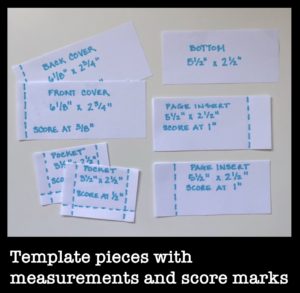
Journal frame pieces
I used two pieces of the 12” x 12” black cardstock and cut/scored the following:
- Front/back covers: 6 1/8” x 2 3/4”, score at 3/8”
- Bottom page: 5 1/2” x 2 1/2”
- 6 page inserts: 5 1/2” x 2 1/2”, score at 1” (three on right-hand side and three on the left-hand side)
- 2 pockets: 3 1/2” x 2 1/2”, score at 1/2” on three sides (both short sides and one long side). I removed some of the flaps where they meet at the corners. This makes for a neater corner fold.
Note: For visual ease, I used white paper so assembly was easier to see.
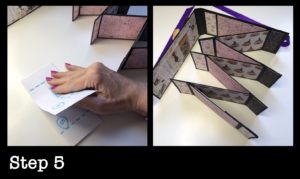
Instructions for assembly
- Cut all the journal frame pieces out of the black card stock.
- Score (fold) as stated and as shown by the dash lines in the reference photo above.
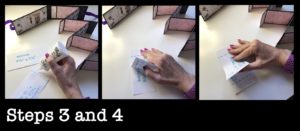
- Focusing on the bottom page and the inserts, glue a right-hand folded insert page to the right-hand side of the bottom page. Make sure your glue doesn’t adhere to the bottom piece.
- Align the left-hand folded insert page to the left-hand side of the first insert page. Apply glue to the 1” area of the fold. Clean any glue that seeps as you go so it doesn’t cause the insert pages to stick together.
- Repeat steps 3 and 4 until all insert pages are glued together. Remember to alternate between right-hand and left-hand as you go. Your last insert page should be on the left-hand side. This will make the zig zag pattern.

- Attach the front and back covers at the spine. The front cover spine seam should cover the back cover spine. Glue together. I used double-sided crafting tape for the spine since it is stronger.
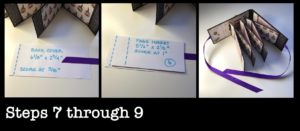
- Attach 12” of the ribbon to the inside of the back cover. I secured about 2” to the cover.
- Attach 12” of the ribbon to the inside of the front cover.
- Center and attach the bottom page to the inside back cover with glue.
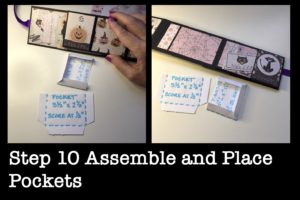
- Fold the three sides of the pockets. Add your adhesive and adhere your pockets on two of the pages. The pocket openings should be oriented landscape so items will not fall out when the journal is closed.
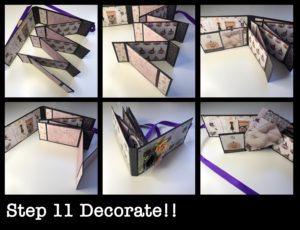
- You are ready to decorate your journal.
- Decorate with your decorative papers and ephemera using glue and/or scor-tape.
Journal design credit: Kay Fatula / The Midnight Kraft Desk (her video instructions for this journal can be watched here).

Michele Brittany is a podcaster, independent scholar, and editor of the Bram Stoker nominated Horror in Space. She is the co-chair of the Ann Radcliffe Academic Conference held annually in conjunction with Stokercon. She is the co-host of H.P. Lovecast, a three times-a-month podcast exploring the derivative writings/films, etc. of H.P. Lovecraft and horror studies more generally. Programming is streamed on all major streaming services. She is the co-editor of Horror Literature from Gothic to Post-Modern published by McFarland. Her partner in crime (and life) is Nicholas Diak, who shares “co” duties.
Prize: Comment below or via email for an opportunity to win the three-themed journals in the title photo. She’ll ship international.
I remain in awe of creatives who can do these types of things so easily–and beautifully!–and can then break the process down to teach others how to create the beauty. Thank you for sharing!
Thank you for your kind words Rhonda and you’re welcome!!
It’s awesome to see these tutorials on here! Great article for the Halloween season.
Thank you so much Jeffrey! I’m glad you enjoyed the tutorial and I wish you a spooky Halloween season!
As a zinemaker, I love this! I love that you did this. Thank you sharing this with us.
You are so very welcome Sumiko, it was my pleasure! By the way, I love zine making too!
Yet, another talent I did not know you had. I will have to try my hand at this next time I have a free afternoon (I’m thinking sometime 2047). Thanks for sharing!
Jan, I’m a “Jane of all trades” ;o) Thanks so much for stopping by, taking a read, and leaving a comment. I sincerely appreciate it!
Love the idea! Just wish i was a little more crafty hahaha
Thanks for your comment, Joel! Well, if you ever decide to give the journal a try, I think you’ll enjoy how easy they are to make and the endless decorating ideas. =)
That was so much fun! I’m making one, or two, or three…
Thanks so much.
Marla, lol! Making these journals are addictive! I made three, but I think I’ll make some more since they are that much fun and super quick. Enjoy!
These are gorgeous, Michele, and at last – a non-bloody use for the trusty dagger! 🙂
Thanks Janet! They were a lot of fun and pretty quick to make. I think I spend more time deciding on the papers and ephemera I wanted to use to decorate each journal. Glad you liked the dagger line – I was thinking of you when I wrote that ;o)
Those are so beautiful! Thanks so much for sharing!
Thank you so much! I hope you give the template a try since I think you could incorporate your artistic endeavors into these. =)
These are so cool! I definitely want to try making myself at home:)
Angela, you’ll have to show me your journals once you are done!