


Welcome to a Best Of Halloween Haunts from 2018…
I’ve always thought book-signing events should be cool and awesome, and with that in mind I always bring a few treats to give away. Buttons, flash fiction postcards, gift bags, and the occasional monster. Everyone, it turns out, loves monsters. They make people happy, so here’s how to make one (or a dozen) and if you haven’t done this before, it’s time to assemble a bunch of sharp, stabby objects and scare yourself silly (after all, what would October be without a few scares, eh?).
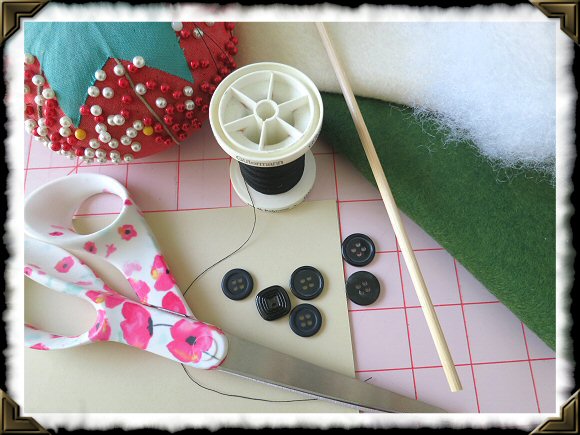
Gather the following –
Half a yard of wool felt (body).
A square of craft felt in a contrast color (eyes).
Polyester stuffing.
Buttons (eyes).
A piece of card and a pencil (pattern).
A reel of sewing thread.
A skein of embroidery thread in a contrast color.
You will also need the following array of sharp, stabby objects* –
Scissors.
A hellish sharp embroidery needle.
Pins.
A wooden skewer.
*SHARP STABBY OBJECTS ARE SHARP. ALWAYS TAKE DUE CARE, AND KEEP THEM AWAY FROM YOUNG CHILDREN AND ANIMALS.
Are we ready? Then let us begin the cutting, the stabbing, the stitching, the skewering, and the stuffing.
Fold the card in half, grab the pencil, and draw half a monster against the fold. Experiment, but keep it simple and not too small (you’ll thank yourself later, particularly during the skewering and stuffing sections).
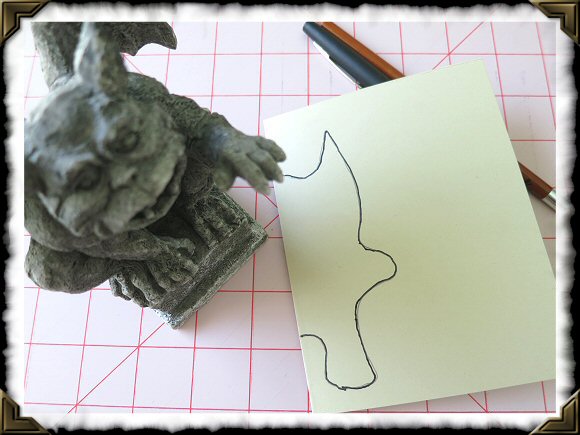
Ignoring the fold, use the scissors (not your teeth, unless you have a very precise bite) to cut around the pencil line. Unfold the piece, and lo! – you now have an awesome, symmetrical pattern.
Take the wool felt and fold it in half, giving you two layers (we’ll need two pieces for the monster).
Pin the pattern firmly to both layers. Use as many pins as you need. This is where you can get really stabby if you want to. Stab, stab, and stab some more (but watch your fingers).
Pick up the scissors. Take a deep breath, stay calm, and begin cutting slightly OUTSIDE the pattern (see picture below). This gives you what’s known in the trade as a seam allowance, the reason for which will become evident when we start to use the hellish sharp embroidery needle. When you’re done, it should look like this –

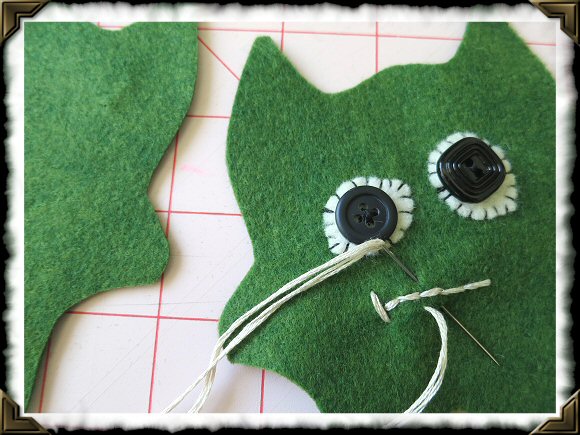
And now it’s time to build a face!
Before we begin sewing – a few TIPS and TRICKS!
NOTE ON CONSTRUCTION: When constructing the face, keep to the center, don’t go too near the edges, and don’t worry about symmetry at this point. A quirky, uneven face gives your monster some character.
NOTE ON THREADING THE NEEDLE: For strength and visibility on a project such as this, I always double my thread (by pulling the thread through until both ends meet). Also, I never load up too much thread. Long lengths can twist and become knotted. A 2 ft length of thread doubled up gives you a 1ft length to work with. Better to re-thread part way through, than fly into a rage when everything becomes tangled. (Not that I’ve ever flown into a rage when this happens… ahem.)
NOTE ON STITCHING: Don’t worry if you’ve never stitched before. Once you’ve anchored the thread in the fabric, all you’re doing is pushing a thread-loaded needle down into one section of the fabric and pulling it up in another section. This is no Black Art. As we all know, the Black Arts are reserved for our glorious editors, who work magic on our prose.
NOTE ON ANCHORING: Some tie a knot, so the thread won’t pull through at the very beginning. That’s okay for some projects, but it’s not strong enough for this one. Instead, lay down three small stitches in place, and the thread will never come loose.
Argh, all these notes and whatnot! Are we scared yet? Ha ha! Okay, onward.
Unpin and remove the pattern. Separate the two layers of felt. We will be working with just one layer at this point.
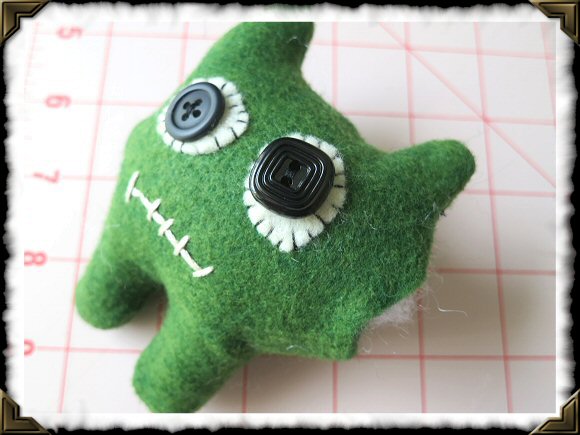
Take the square of contrast color craft felt and cut two small circles for the eyes. Gather a couple of buttons, also for the eyes.
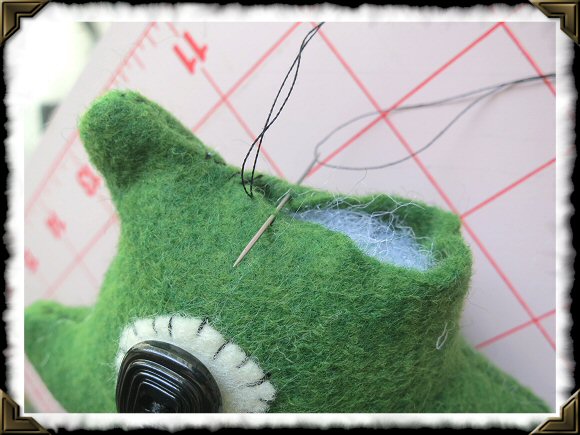
Pin the felt section of the eyes to the body, pick up your threaded, hellish sharp embroidery needle and stitch (see below). Don’t worry if it doesn’t look symmetrical or the stitches are a little wild. This is a monster we’re building.
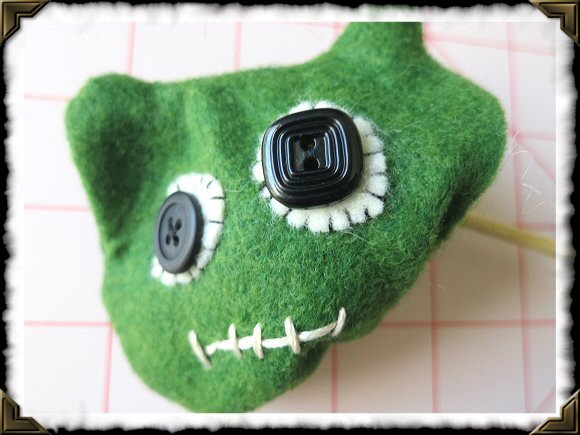
Sew on the buttons (see below). Four or five passes through the buttons with a double threaded needle (after anchoring before and after at the back) will give a firm, secure fastening.

For the mouth, switch out your sewing thread for the contrast color embroidery thread. I used all six strands for this (see below). Experiment on a spare piece of fabric, if you like. Every monster mouth is different.
Okay, you say, but how do I “draw” a straight line with thread, like that?
In this instance I anchored and did a running stitch (over, under, over, under) for approx an inch and a half, then turned around and did the same stitch in the opposite direction (filling in the spaces). Once you’ve mastered it (which I haven’t in this particular example), the next time one of your Elizabethan re-enactor friends talks about Holbein stitch, you can say “Oh, yah, I can do that.”
See all the wicked cool things we’re learning, here?
Once the face is done, it’s time to put it all together!
Place the two monster pieces back together. Match up all the edges. Make sure the face is ON THE INSIDE. (See below.)
Fabric tends to creep, crawl, and slide, so get stabby with those pins, and use as many as you need to.
Now—wait, wait, wait—before you start stitching—study the shape of your monster. Remember, you’ll have to leave a gap, so you can turn the little rascal inside out, so look for a straight edge that’ll be easy to manipulate. I’ve chosen a point between one of the paws, and the base of the ear. (See below.)
Load up the hellish sharp embroidery needle with double sewing thread, make sure you have a firm anchor (more about that later) and start stitching the two pieces together. As you can seen below, I’m using a tiny running stitch. Slow and careful is the secret to this, there’s no way around it, so order-in lunch, or grab a fortnight’s worth of provisions, and settle in for the long haul. (This actually took about 15 mins.)
Also, remember we were discussing seam allowances, earlier? See how it comes into play?

When you’re approaching the end, remember you’ll need to leave a sufficient gap for the turning and the stuffing. Also make sure your final anchor stitches are strong.
Don’t forget to remove all the pins. There’s nothing like inadvertently stabbing yourself in the finger with a stray pin when you’re turning the little beast inside out. Been there, done that, and OMG it hurts.
Okay, it’s time to grab the wooden skewer!

Using your fingers, take care while turning your monster the right way out. There will be some tugging and pulling, which is why I emphasized stitching strong anchor points at either end of the gap.
Use the BLUNT end of the skewer to push out legs, ears, and any other narrow sections (see work-in-progress below). We do this carefully, so as not to tear a hole in the fabric or rip open our hard-earned stitches.
Now it’s time to stuff the little beast.
Break up the polyester stuffing into small, fist-sized pieces. You will need more than you think, because it’s like the Tardis in there. Stuff the extremities first. Again, use the BLUNT end of the skewer to pack the stuffing into the narrow sections. Keep stuffing until you can’t stuff any more (although leave a little breathing room close to the gap).
One final task and we’re done!
At the outset, this might seem horribly difficult, but if you gently pinch the fabric together near one end of the gap, the seam allowances will roll inward, enabling you to stitch across the gap and draw it to a close. Just pinch and stitch, pinch and stitch. Use the skewer to help push the fabric inward if needed. Pins can also be used, depending on the length of the gap, the type of fabric, etc. etc.
And voila! Look what you did!

Once you have the basics down, you can create all shapes and sizes, use all manner of fabrics. (And I promise you, subsequent monsters will take a tenth of the time required to make the first one.)
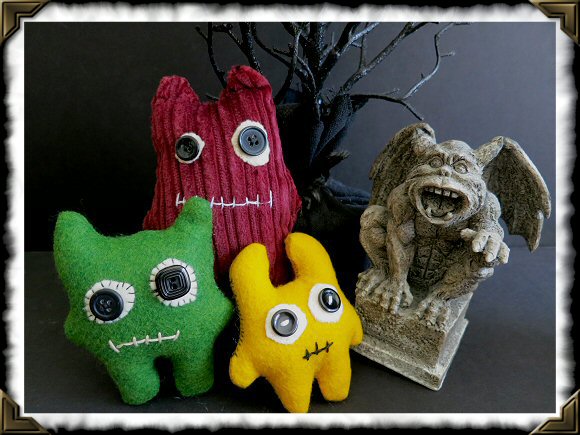
Here’s the gang, all ready for the next event!

BIO: Janet Joyce Holden is the author of seven novels—Carousel, The Only Red Is Blood, the five-volume Origins of Blood vampire series—along with a number of short stories which can be found in various anthologies. She is currently at work on a series of three young adult novellas.
Website: janetjoyceholden.com
Contact: janjholden@gmail.com